 One
major disadvantage to using a digital single lens reflex camera (DSLR) compared
to a dedicated astronomical CCD camera for astrophotography is the problem
of uncontrolled dark noise. Dark noise comes primarily from heat and
looks like sprinkles of green, blue and red across the whole image as you
can see in the example to the left. The longer the exposure and the
warmer the camera the worse the noise. Dedicated astronomical CCD
cameras deal with this problem by cooling the CCD chip with a Peltier
cooler. DSLR cameras suppress this noise by having special circuitry
on the chip. In both cases the best way to eliminate the remaining
noise is by taking dark frames. Dark frames are exposures with the
camera at the same temperature and for the same exposure time as the light
exposure but with no light at all hitting the sensor. This way just
the thermal noise from the imaging chip shows up which can be digitally
removed from the light frame greatly increasing the quality of the
image. But due to the random nature of some of this noise on DSLR
cameras, it can't be easily eliminated. This leaves you with only
two options if you want to use a DSLR for astrophotography on hot
nights. 1) You can take much shorter exposures or 2) you can cool
the camera somehow. Shorter exposures defeats one of the fundamental
needs of astrophotography so cooling the camera is the only remaining
option. Newer DSLR cameras like the Canon Rebel Xsi do a really good
job at suppression this noise, but it is still a problem especially with
high temperatures. One
major disadvantage to using a digital single lens reflex camera (DSLR) compared
to a dedicated astronomical CCD camera for astrophotography is the problem
of uncontrolled dark noise. Dark noise comes primarily from heat and
looks like sprinkles of green, blue and red across the whole image as you
can see in the example to the left. The longer the exposure and the
warmer the camera the worse the noise. Dedicated astronomical CCD
cameras deal with this problem by cooling the CCD chip with a Peltier
cooler. DSLR cameras suppress this noise by having special circuitry
on the chip. In both cases the best way to eliminate the remaining
noise is by taking dark frames. Dark frames are exposures with the
camera at the same temperature and for the same exposure time as the light
exposure but with no light at all hitting the sensor. This way just
the thermal noise from the imaging chip shows up which can be digitally
removed from the light frame greatly increasing the quality of the
image. But due to the random nature of some of this noise on DSLR
cameras, it can't be easily eliminated. This leaves you with only
two options if you want to use a DSLR for astrophotography on hot
nights. 1) You can take much shorter exposures or 2) you can cool
the camera somehow. Shorter exposures defeats one of the fundamental
needs of astrophotography so cooling the camera is the only remaining
option. Newer DSLR cameras like the Canon Rebel Xsi do a really good
job at suppression this noise, but it is still a problem especially with
high temperatures.
For many people, living in more moderate climates
this issue can be dealt with fairly well with good dark frames, but I live
in one of the hottest places in the United States. This issue
becomes so significant in the summer I have simply given up on trying to
take images with my Canon Rebel 350xt for 5 or 6 months of the year.
If you look through my images
page you may notice a striking difference between the quality of my
winter objects like M42 and my summer objects like M16. This is
largely due to this hot camera issue.
I was resigned to the fact that I was
going to have to invest in an expensive cooled CCD camera until I discovered
Gary
Honis' webpage and how he built a special box for his Canon DSLR to cool the whole
camera using readily available stuff and simple tools. At first I didn't think I could make such a box, but thanks
to Gary's great webpage and a few emails back and forth I built my box.
If you are considering building a box yourself I highly recommend visiting
and reading through Gary's webpage first as most of my ideas were borrowed
from him.
My goal was to build a box that would
cool my camera down at least 30F from the ambient temperature. Based
on experience so far my Canon 350xt behaves rather well below about 50F so
my ultimate goal is to be able to cool the camera to 50F even if the ambient
temperature is 100F which is about my worse case situation here in
Southern Arizona. My first box was built using the cheapest aluminum
I could find at Lowes. It was little 8" x 4" x 4"
angles used for gutters. I epoxied them together to form a box using
JB Weld. I was very disappointed with the performance of my first
box. It turns out the aluminum used did not have as good of thermal
properties as pure aluminum which seriously slowed the cooling process and
the epoxy bond between sections also acted like insulation. Only
after my first attempt did I realize how important the thermal
conductivity of the lining is to quicken cooling times. Gary used
high quality aluminum primarily because it has good thermal conductivity
and it is so light. But copper
actually has almost twice the thermal conductivity of aluminum.
I decided to use copper for this very reason although it is about 3 times
as heavy as aluminum, about 3 times the price and a lot harder to
find.
After searching all my local hardware
stores I could not find pure sheets of copper anywhere. I finally
found it online from here.
It is very soft metal (much softer than aluminum) and is very easily cut
and bend. I made the bends simply by pressing a steel straight edge
down along the line and bending the metal by hand.

Below is an image of how I cut out my box
from the 12" x 12" copper sheet. The oddball 3.25" x
4" rectangle on the upper right was used as the left side of the
box. With copper being rather expensive I didn't want to buy a
larger sheet only to have more waste. The dotted lines are fold
lines and the thinner solid lines are cut lines. The hole in the
center is only approximate.


I soldered my box together. This provides great thermal continuity and was easier
to work with than epoxy as it is bonds in seconds. I simply fluxed
and then clamped the edge I was working on, applied a propane torch and
then placed silver solder to the area until the joint was clearly
sealed. I've soldered copper pipes many times over the years so this
was not at all intimidating to me. I figured copper was copper and
should solder up nicely.

I used thermal epoxy to attach the aluminum cold plate on the back of my
box. This plate came with my travel cooler and so I've been
using it. It turns out this may not be necessary and may be slowing
my cooling due to the extra mass needed to cool. I may be better off
attaching the Peltier directly to the side of the
box.

I cut out 1" thick foam from Home Depot and hot glued it to the
box. Notice how I carved out the recess for the Peltier
cooler. This saved me from having to use expanding foam which is
very messy.

I tried with and without the internal fan. The internal fan speeds
up cooling by about 5F an hour. I also opted for insulating the
camera adaptor as I see that as a source of cooling loss more than a place
to cool the camera more. Some loss is inevitable as you need a clear
opening so the camera can work, but I figured it was better to insulate
here.
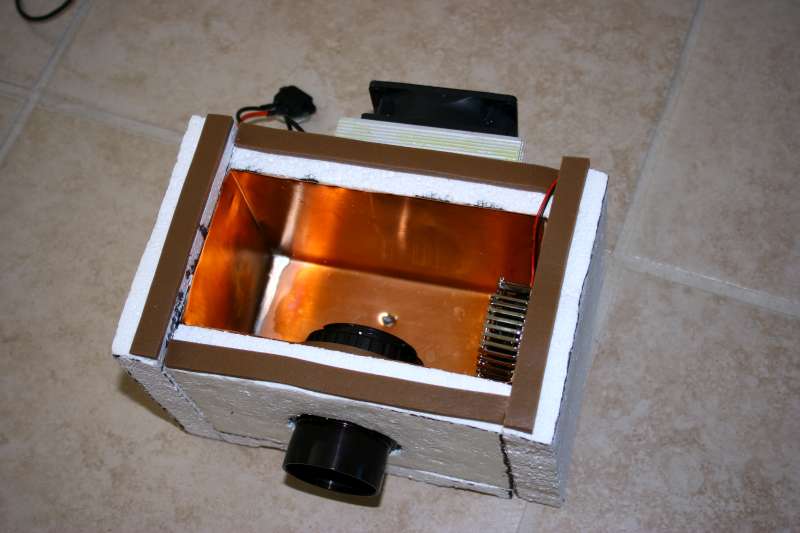
Another view of the inside of my box.

Here is my box with the top on and the velcro straps holding it
together. The thermometer tells me the temperature inside the box so
I can record the difference in temperature I get with the box. The
completed box weighs in at about 3lbs (I'm guessing. I'll weigh it
exactly soon).

Another view of the completed box.

I look forward to testing this on the scope soon. So far I'm getting
about 30F drop in an hour and about 40F if I leave it on all night.
The
Peltier cooler I got from the travel cooler is rated at only 45
watts. I discovered I could get a 138 watt cooler of the same dimensions
from these
guys for only $12.95. I'll be installing that as soon as it
arrives and running new tests. 138 watts is 11.5 amps at 12 volts
which will drain my 110 amp/hr battery in less than 10 hours. That
still means I can run the camera one full night and 138 watts should
provide some serious cold to the camera and quickly too (I hope)!
Maybe I can achieve my ultimate goal of a drop of 50F with the new Peltier
cooler. |